2.25.2014

identity crisis

Suddenly I've realized that somewhere along the line of having kids and becoming a mom, some of myself just kind of slipped away. I was a target shopping for baby food when I caught a glimpse of myself in the mirror. WTF?! I was wearing house slippers, polka-dot mom blue-jeans, with a horribly fitting polka-dot blue button up. Luckily I had my baby carrier over the majority of the top. For me, this was rock bottom. I went home and filled a huge box of ill-fitting clothes, and striped-everything and drove it directly to our local thrift store. When did I settle on looking mediocre instead of the way that I want to look?! When did I start shopping primarily at the old-navy clearance rack?! Out with the old!

Its not only about appearances, I feel like I am not really sure who I am anymore as well. A few weeks ago I found myself with a bit of kid free time to kill, and seriously, I couldn't even remember what I like to do. Do I still enjoy sitting in a cafe and reading alone, Or would I like to go to a bookstore and treat myself to a new magazine? I kept answering myself 'no don't get a magazine when will you ever find time to look at it?' etc. I am my own worst enemy, and I am now on a path of self-discovery.

I bought myself this journal and I am jumping in with both feet. Care to join?!

1.30.2014

Kid Clothes Week Day 3 + 4

Day Three and Four came by in a FLASH! I have been feverishly sewing my baby moccasins. They are seriously the most comfortable baby shoe that never falls off. They are stylish and very soft on the babes foot as they learn to crawl and walk. They also keep socks in place. They are cotton on the top, and leather on the bottom. Elastic in the back keeps them held snug to your baby's foot. They are seriously the perfect baby shower gift.

1.28.2014

Kids Clothes Week Day 1

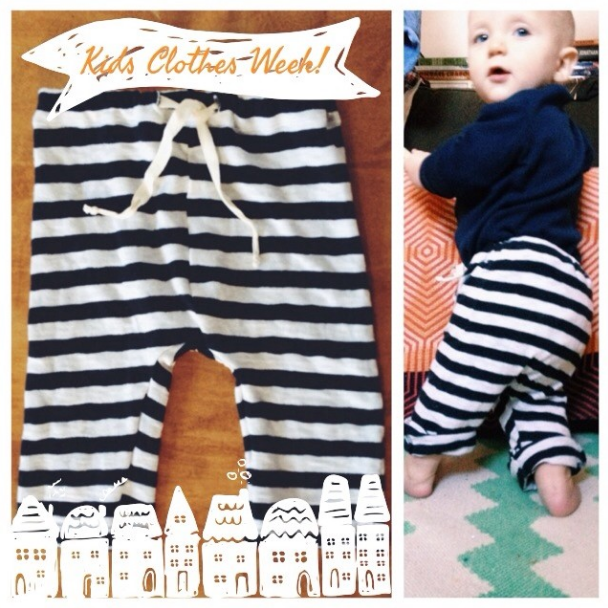
We are back- and instead of making excuses I am just going to jump right back into things. Were going along with Elsie Marley's genius Kid Clothes Week Challenge to sew one hour each day this week of kids clothes. Yesterday was the kick-off and we went with a recycled T-shirt sewn into drawstring baby pants.
I might make a little tutorial if anyone is interested. 
Its good to be back.

Also please check out my new Etsy site!! 

3.11.2013

New babe's name...


     And the boy's name is going to be; Moon. Mainly because we adore the name Moon, we love all that it encompasses - specifically the unique tie that it has on each of us as individuals. Originally we came up with idea of using Moon for our second child's name on my birthday. We were out to dinner talking about the fact that there are really only 2 or 3 boy names that we would even consider, when my husband {Trevor} suggested that we think more outside the box. We started talking about our favorite things in life which led us right to, nature. We quickly agreed that we wanted to use a name that held some tie to nature and the outdoors. We went through a list of different tree's, forests, rocks, and elements -then Trevor suggested, Moon. I immediately got a feeling that >this was it< and why not?! 
     We tried so hard to pick something original with Hazel (our first) and at first we had settled on Scout. Both of us regretted switching from Scout Hazel to Hazel Scout at the hospital. The name Hazel, suits her so well and it will always be her name, I just felt so much pressure from different members of our family- and in the moment at the hospital, as family was flooding in just moments after her arrival, I just kind of caved and went with name that was much more accepted within our family, Hazel. This time around I do not want to have any regrets, I know so much more about how this will all pan out, and so I am going for it. Moon Huish. We will call him Moony- and yes that is in direct reference to J.K. Rowling's character in the Harry Potter books, Remus Lupin.
     We realize that it is not a traditional name, and he may take some heat later in life, but luckily we will be able to face that together as a family. We love every aspect of the moon, and we think that it fits right into this crazy bohemian family lifestyle that we are trying to create for ourselves and our children. 'Moon' was one of Hazel's first words, and since she was able to string words together, she whispers to us at night, "I love you to the moon, and the stars, and the shiny moon stars." We are all  ecstatic for this new baby, and can not wait to welcome our own Moon into this world.

3.06.2013

TUTORIAL- Sew your own knotted newborn sleeper...


I have been drooling over these knotted sleeper's from Mod Swad, only I don't know if I will ever feel okay about spending $35 dollars on any onesie -ever. So I came up with a little tutorial on how to sew your own knotted baby sleep sack. I think they would make the perfect baby shower gift. All you need is an old (or new) Jersey stretch T-shirt, a 16 inch zipper, and one button. 


  • Start by laying a full body baby suit- of whatever size you want down on top of your shirt. Use the neck of the shirt, so that you do not have to sew your own.
  • Trim along the sides of the body-suit.. {you will want to tuck the arms in and cross the legs so that they don't get too big, this sleeper is meant to be REALLY snug to the baby's body.}
  • Use your first cut edge as a guideline on where to cut the other side (fold in half, then cut)
  • Use your zipper to measure how far into the front piece to cut your zipper opening. {cut it right down the center of the FRONT only.
  • End with pinning your neck in so that it is small enough for the baby. {i just made simple darts}
  • You will also need an extra scrap of fabric cut 4 inch by 1.25 inch - this will become the button strap that covers the top of the zipper.

1. Sew the long side of your button strap, as well as one short side,
2. Turn it inside-out then topstich the three edges that are closed,
3. Add a button hole on short sewn edge.

4. Sandwich the button hole piece (with the raw edge side) between the right side of the zipper and the right side of the zipper opening --baste to keep it all together.
5. Check your basting stitches to be sure you got the zipper sewn on the right side of the fabric.
6. Sew your button onto the other side of the zipper opening.

7. Sew the zipper down on each side, backstich once you get to about .5 inch to the end of your zipper.
8. Sew under the zipper to close off the bottom of the zipper opening.
9. Topstich down the entire zipper, to keep the fabric from getting caught in the zipper. -no photo-
10. Sew the neck smaller, and make sure the shoulders lay right, this took me two or three times before it looked just right.
11. Sew down both sides, of the sleeper, and backstich once you get about 1.5 inches below the zipper line. -no photo-
12. Trim all excess fabric and threads.

Sorry, It was kind of hard to see the stitches I was making with the black on black. please leave a comment with any ququestions you come up with along the way! Happy Sewing!
 

3.04.2013

Nesting, or something like it.

This is going to be the new guys blessing gown:

  Baby Kimono with Raglan Shaping


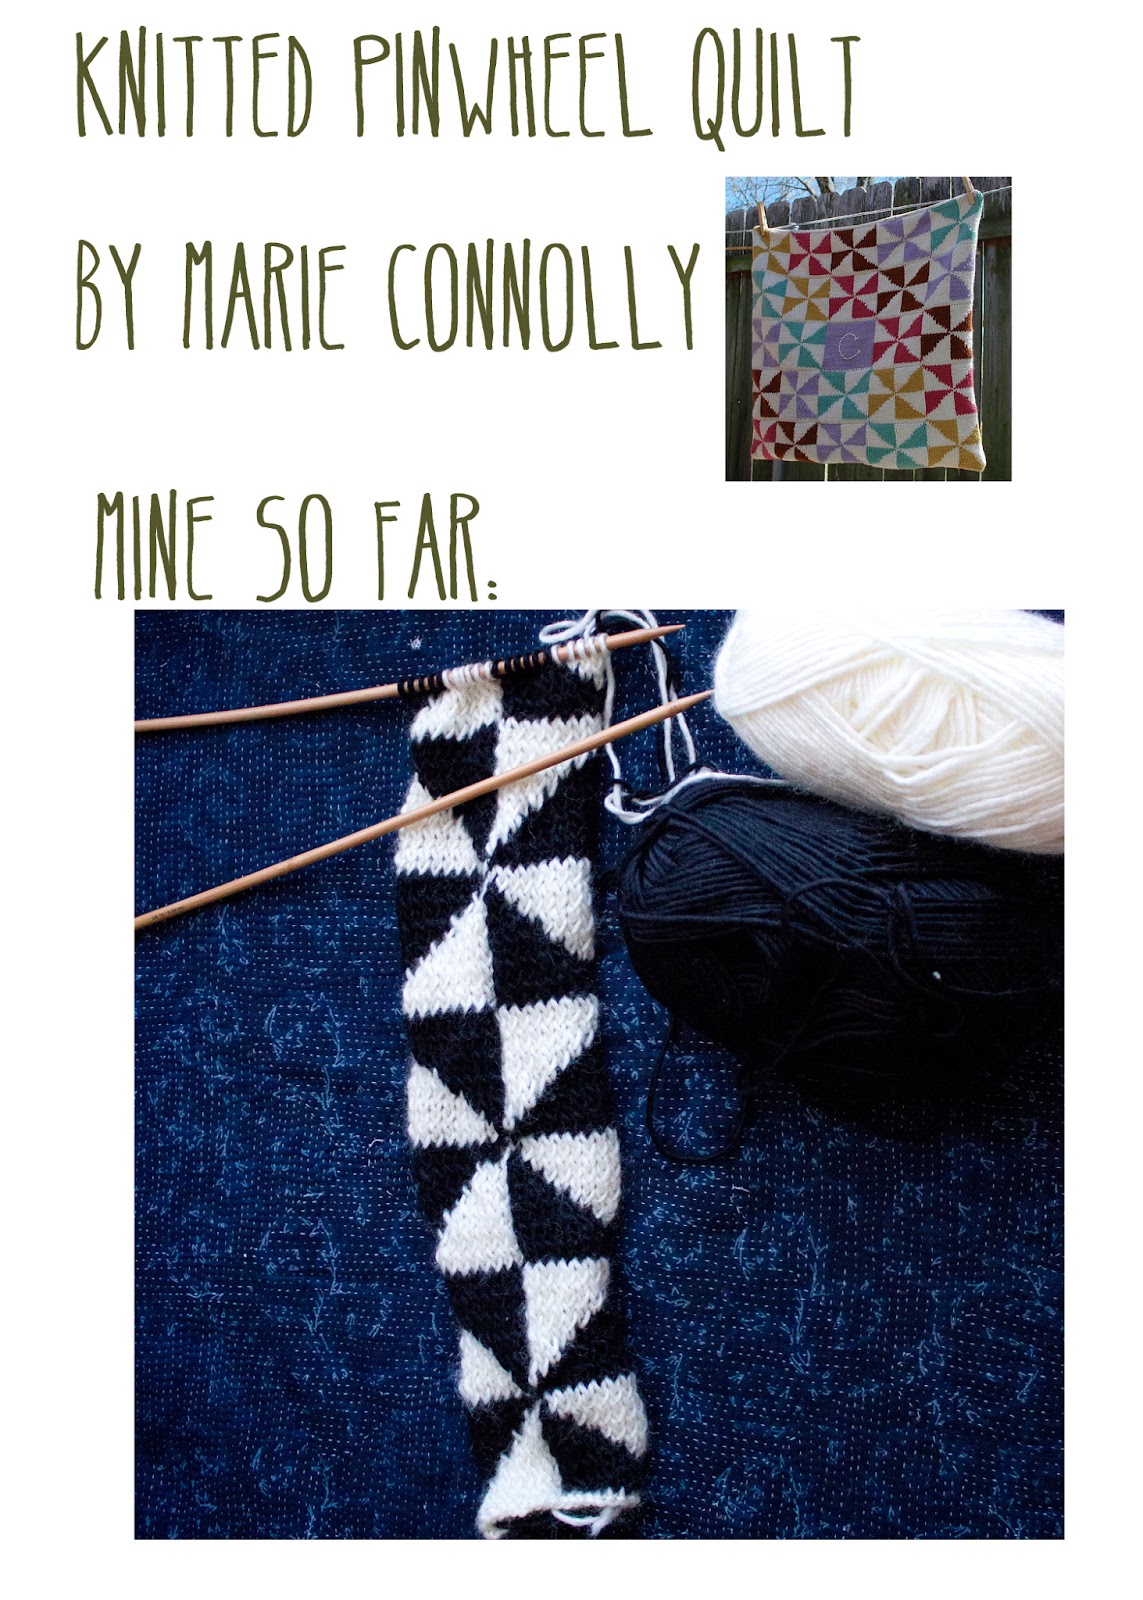
Since I found out I am having a boy-child, My fingers have been feverishly knitting. I have started 12 different projects, and so far finished.. 3?!  I am going to start a weekly update here -in the hopes that telling someone about my projects will make me actually complete something everything- before this little guy gets here. I have 13 weeks to go, and 9 knitting projects to finish. I think I have a pretty good chance of getting it all done in time. I will also  be posting updates regularly on instagram (@jessiefacehuish) If you want to keep a look out there as well. So here we go, knitting challenge week 1

Cool Kids´Capris


Pointed Pixie hat


Find more here.

Find more here.

Find more here.

Find more here.

Find more here.

Find more here.

Find more here.

Knitted Baby Hat

Pattern by Fiona Duthie
Find more here.

2.28.2013

Bathtub Painting


To make Bathtub Paint all you need is:
  •  1 Cup of body wash
  • 1/2 Cup of Cornstarch
  • 1/2 Cup of Water
  • Kool-Aid (food coloring will give you brighter colors)
  1. Mix the cornstarch and water in a {sauce pan} until it is dissolved – it should still be a bit pasty, but not clumpy. Then bring the cornstarch water to a boil – stir constantly to get out all the chunks
  2. Add the soap and mix, heating on medium until just boiling. The soap should have a gel-like consistency as it cools. 
  3. Add Kool-Aid. {I guess that food coloring has the best results- I just didn't want it all over hazel's body.}

 *You can store your paint in an airtight container. The paint will separate slightly when stored, so be sure to stir well before use.*

2.25.2013

A moma's life...

via, via, via, via, via, via, via
       Last week we had a major sharpie incident, where Hazel had snuck a sharpie into her bed for nap time... needless to say she drew 'H's all over her baby blanket. I was overcome with this feeling that this is only the beginning.. There are going to be years and years of destruction in my future. It surprised me because, I am totally okay with that. Things are just things, they come and go. Being a moma, and spending time with my babies, is all that I care about right now. We have been getting ready for this new little guy, and I am dying with anticipation. In the first couple of months I would wake up with so much anxiety that I had made the wrong choice, I kept thinking that things are so perfect with Hazel as they are - why would I want to mess with this? I have come to the conclusion that we need this little guy: our lives have become so intensely happy and full of joy from Hazel's sweet spirit - I can not imagine what another little angel could bring. Anyway I will try to get more consistent with blogging, I have just been so busy planning (and napping!)

1.24.2013

Simple No-Fry Doughnuts

This time around with baby #2 on the way, all I have ever been wanting to eat is doughnuts...? Why not, I say..! Anyway I stumbled upon this easy recipe and have been doing a little baking of my own;

Simple No-Fry Doughnuts:
For a printable--> here + here!
 15 doughnuts:

Dough
3/4 cups Warm Milk
1 packet Active Dry Yeast
1 tbsp. Unsalted Butter
1/3 cup Sugar
1 Egg
2 ½ cup All Purpose Flour
Pinch of Nutmeg
½ tsp. Salt

Glaze
Will make enough to glaze all the doughnuts
¼ cup Milk
1 tsp. Pure Vanilla Extract
2 cups Confectioners Sugar

For the Cinnamon Sugar Topping
Will make enough to cover all of the doughnuts
½ cup Unsalted Butter
1 cup Sugar
1 tbsp. Cinnamon 
DOUGH:
¼ cups of the warm milk in the bowl of a stand mixer.  Sprinkle the yeast over the milk.  Let sit for 5 minutes.

In a small bowl, combine the remaining ½ cup of milk with the sugar and butter.  Add it to the yeast mixture.  Stir to combine.  Add the egg and stir until mixed.  Add flour, nutmeg, and salt and stir until the dough starts to form.  Change to the dough hook and knead for until the dough becomes smooth.  {If dough is too sticky, slowly add more flour.}

Transfer to the dough to a lightly floured surface and knead for 5 minutes until the dough is smooth and elastic and has formed a ball.  Place the dough ball in a large lightly greased bowl, and cover with plastic wrap.  Let sit in a warm place for about 1 hour, until doubled in size. 

Once the dough has doubled, roll it out on a lightly floured surface until ½ thick.  Using a doughnut cutter (if you don’t have a doughnut cutter, you can use 2 biscuit cutters – 1 that is about 3 inches, and the other that is about 2 inches for the inner circle) cut out the doughnuts until you have no dough left.
Place the doughnuts on a baking sheet lined with a silicone mat or parchment paper, about 2 inches apart.  Cover with a clean towel and let sit for about 45 minutes.

Preheat the oven 375 degrees F. 

Place the baking sheets in the oven and bake for 7 minutes, until lightly golden brown.  Be careful to not overbake these.  You want them to be light and doughy inside.  Let the doughnuts cool for about 5 minutes until ready to top with either the glaze or cinnamon sugar topping

While the doughnuts are cooling make the glaze and/or cinnamon sugar glaze.  Each recipe makes enough to cover all the doughnuts.  I made a half recipe of each and topped half of the doughnuts with each topping.  Or you can choose to just do one of topping for all the doughnuts. 

GLAZE:
 combine the milk and the vanilla in a small saucepan.  Heat over low heat until just warmed.  Slowly add in the confectioners sugar and whisk until the mixture is smooth.  Remove the glaze from the heat and place over a bowl of warm water.

To glaze the doughnuts, dip them halfway into the glaze and place on a draining/cooling rack set over a baking sheet.  Sprinkle with sprinkles if desired.  Let set for about 10 minutes.

CINNAMON SUGAR:melt the butter in a saucepan or a microwave, and place in a small bowl.  Combine the sugar and cinnamon in a medium sized bowl. 

To top the doughnuts with cinnamon sugar, dip the halfway into the melted butter.  Then dip them into the cinnamon-sugar mixture.  Set on a draining/cooling rack to set, about 5 minutes.

1.22.2013

Boy Child

via
 After finding out last week that we are expecting a BOY early this June, I spent a billion hours online this weekend rounding up some of my favorite looks/clothing. We are over the moon that the babe is going to be a mancub.. one girl, one boy, one happy family. Anyhow,  I thought I would share some of my favorites:
via

via

via

via

via

via
via
Sorry, some of the links lead to sold out items, but I thought it was still fun to look at.

1.16.2013

cold and flu season: fight back!

If your neck of the woods is anything like ours, everyone is getting sick.  The boys and I are especially susceptible as we are at school all day, surrounded by trillions (gazillions?) of germs.  Little O has already had an ear infection this year, as in 2013.  I have come down with some sort of blessed sinus thing that threatens to last for weeks.  Is it Spring yet?? 

I thought it might be nice to share our family's list of go-to home remedies for coughs and sniffles.  So read up, stock up, and stay healthy!

Peppermint tea with lots of honey is my favorite way to soothe a scratchy throat before bedtime.  Even the kids have been known to enjoy a lukewarm cup of tea.  Our pediatrician told me that studies have shown that honey is just as effective as cough syrup.  Amazing, right?!


These have saved my voice many a school day.  They taste good and have echinacea, which helps lessen the blow of the common cold.


On Guard is a blend of essential oils that includes citrus, clove, and cinnamon.  It helps support the immune system and smells really good.  I rub two or three drops on the bottoms of my feet and the boys' feet every morning before school.  It kept us healthy through the beginning of the school year, although nothing seems to be working against the craziness that is blowing around this flu season.  Also, did I mention that it smells great?


Finally, our pediatrician pointed us in the direction of ZarBee's.  It is an all-natural, honey-based cough syrup.  It really has helped the boys on those restless, cough-filled nights. 

We wish you all health during this new year!

1.09.2013

Independent Play: Quiet Boxes


Winter is here in full force, and it's brutal!  Temperatures have been below freezing for a solid couple of weeks now.  After two weeks in (comparatively) warm Texas, Utah feels like the arctic tundra.  The cold temperatures and nasty air quality mean that we have been spending a lot of time entertaining ourselves indoors. 

I ran out of ideas this week and decided to put together plastic tubs of activities that would encourage independent play.  Here are some items that would be great to keep your preschooler busy during these short (and looooong) winter days:


1.07.2013

anders and oliver's room: part 1

photo by Carolee Beckham
 Our friend Meta shared the first installment of Oliver and Anders' room tour over at one more mushroom last week.  I went to Meta after moving into our new home earlier this year.  The boys' room was large, empty, and intimidating.  I needed a designer's help.  Meta was so great to work with!  She and I were on the same wavelength throughout the entire project, and she had so many great ideas and suggestions for the space. 

Hop on over to one more mushroom to be inspired by more beautiful photos of amazing children's spaces.

1.03.2013

Keep Those Little Fingers Busy.

This was a really fun, simple project papa shared with us this Christmas while we were busy making Christmas crafts. It was a project that they had done in school. All you need is:

    *A bowl of milk
    *Food Coloring
    *Dish Soap
    *A Q-Tip

         Drop the food coloring into the bowl of milk, then dip your Q-Tip into the dish soap. Then you can use your Q-Tip to poke into the colored milk, and the color will disperse away from the soap. It leaves little circle ripples where ever it touches. Hazel absolutely loved this activity!